Connect Okta to SurrealDB to allow members of your organisation to sign in with their Okta credentials. You create an OpenID Connect app integration in the Okta Admin Console, then enter its details in a new connection in SurrealDB Studio.
When you finish, people can sign in to SurrealDB through Okta. You can also let them open SurrealDB from their Okta dashboard, sign them out with Universal Logout, and let Okta create and deactivate their accounts with SCIM.
Before you start, verify the email domain your company uses. You also need an Okta account that can create app integrations.
Step 1: Create an app integration
In the Okta Admin Console, open Applications and Resources, then Applications.
Select Create App Integration.
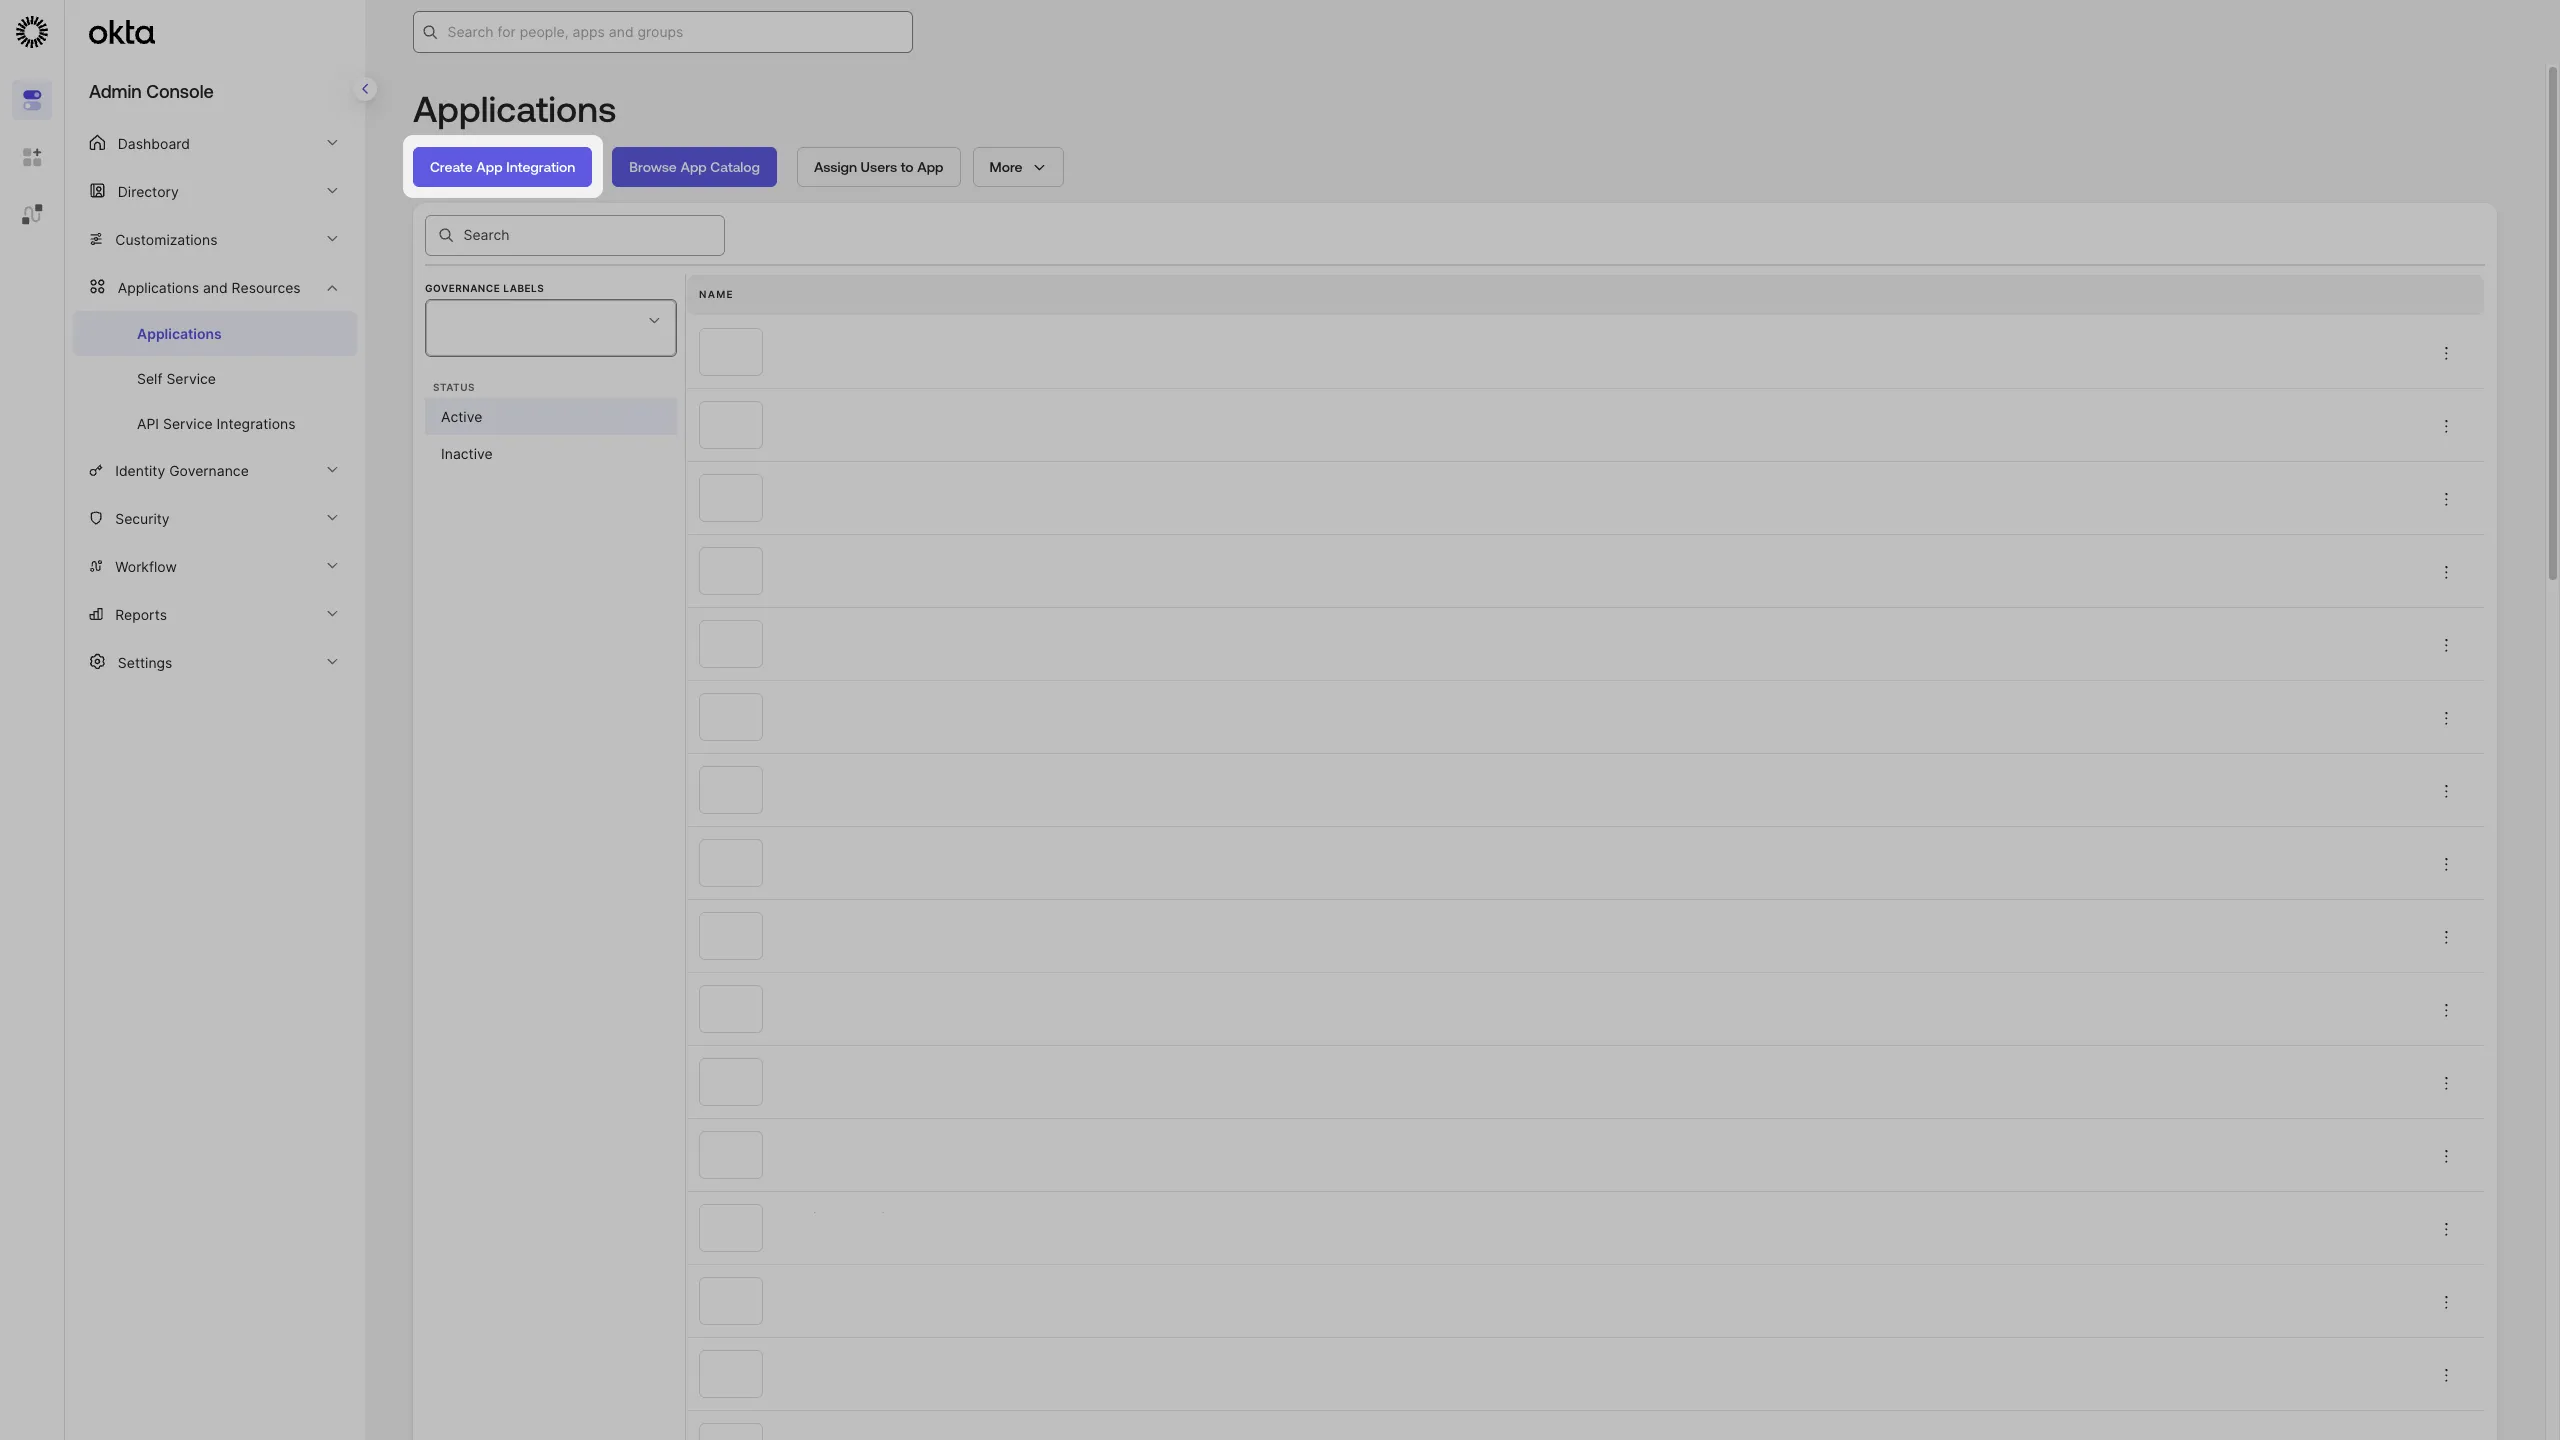
Under Sign-in method, select OIDC - OpenID Connect.
Under Application type, select Web Application.
Select Next.
Step 2: Configure the integration
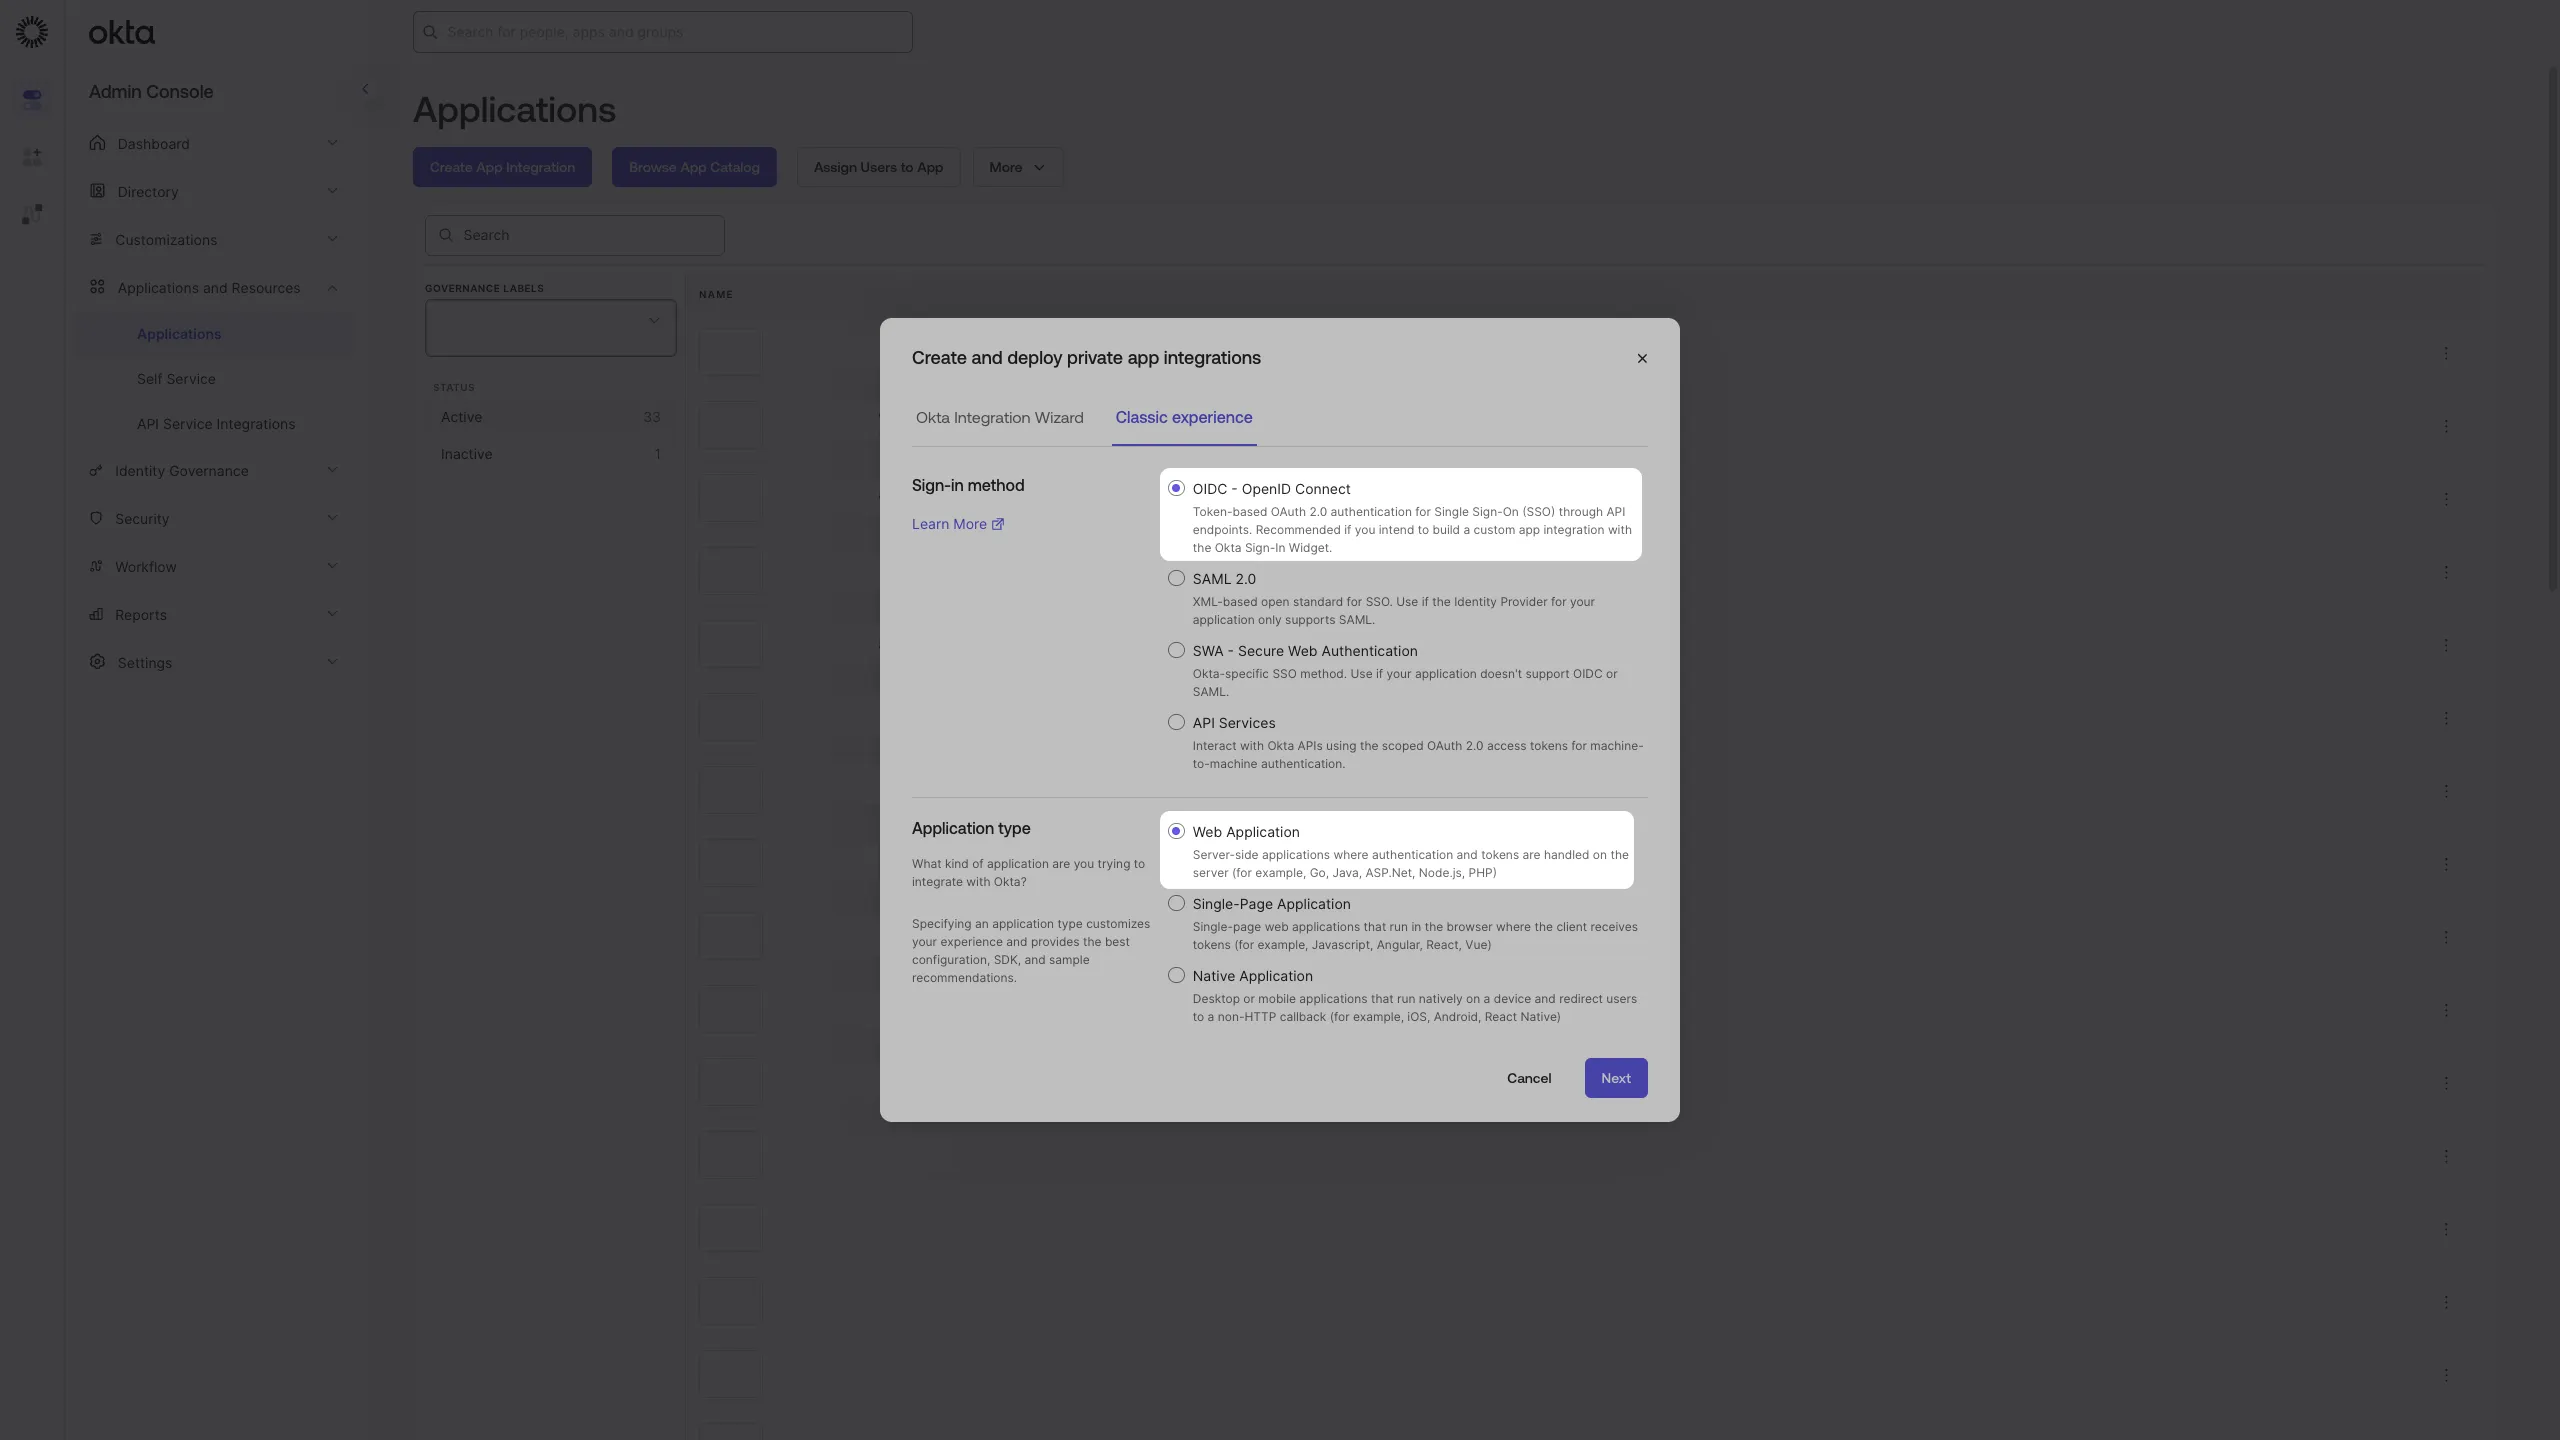
Enter an App integration name, for example
SurrealDB.Under Grant type, make sure Authorization Code is selected.
Under Sign-in redirect URIs, enter
https://auth.surrealdb.com/login/callback.Under Assignments, choose who can use the integration. You can also assign people or groups later, from the integration's Assignments tab.
Select Save.
Only the people and groups assigned to the integration can sign in to SurrealDB through it.
Step 3: Copy the client credentials
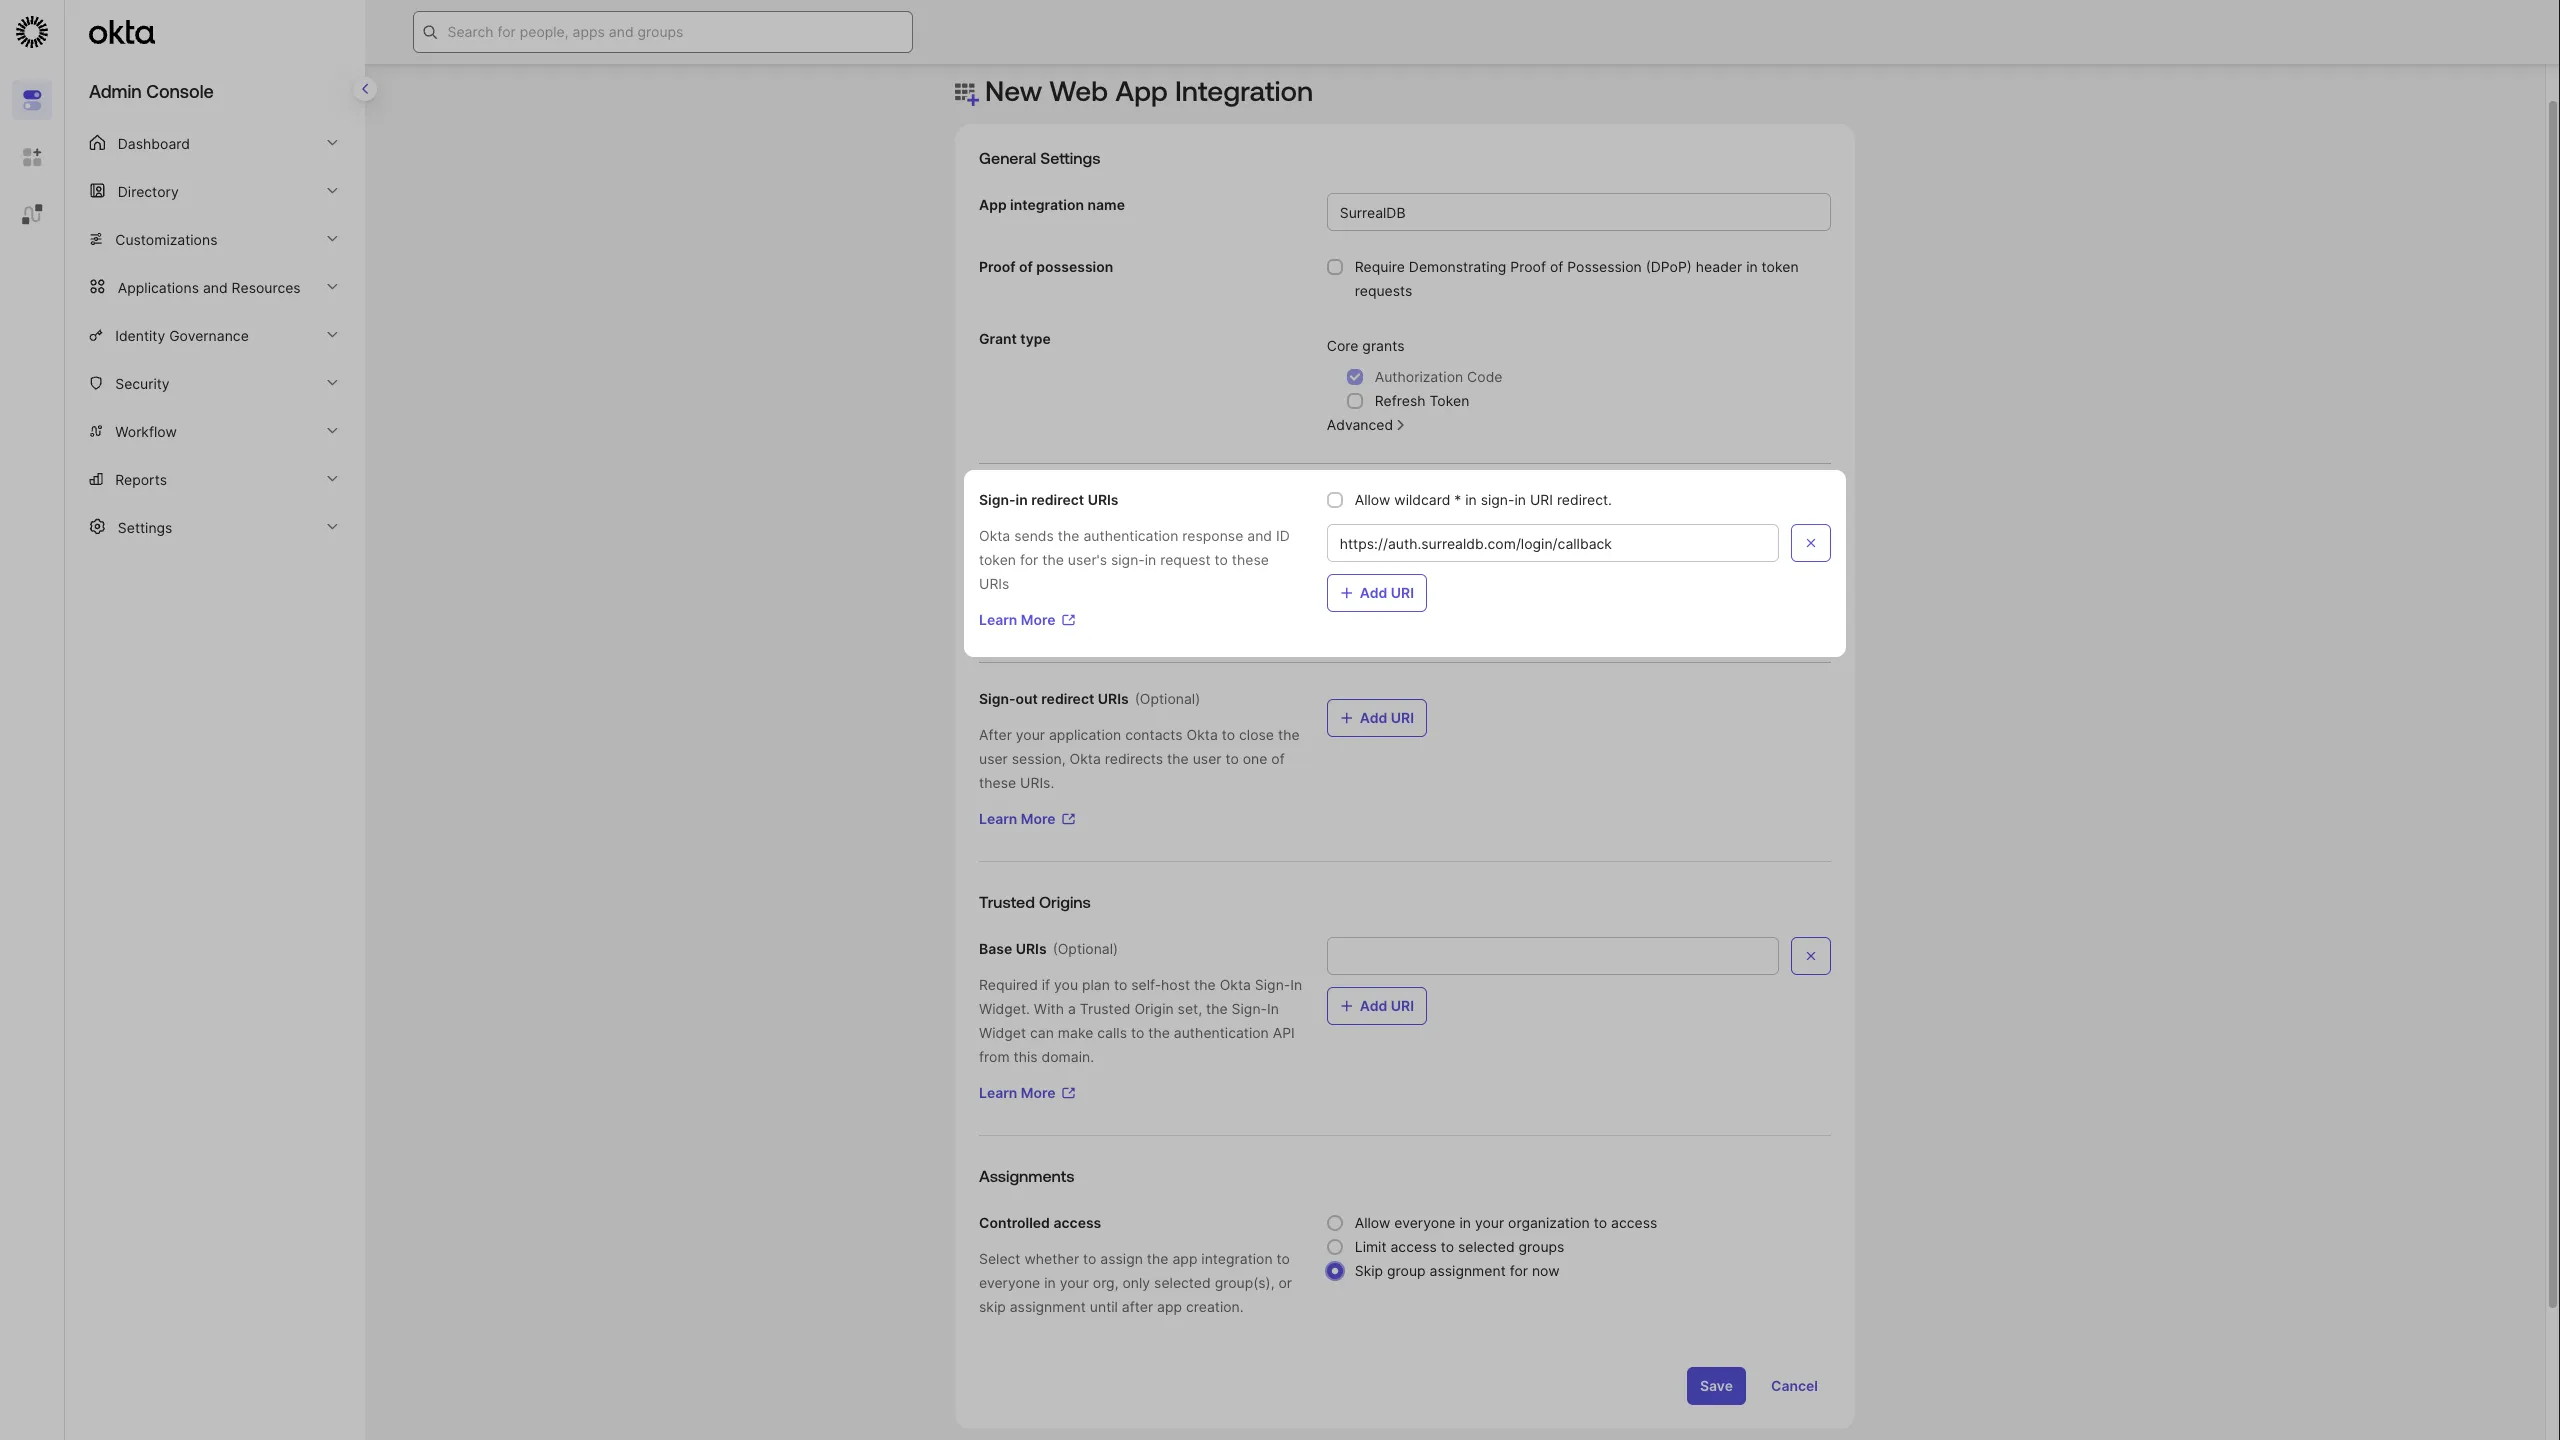
Okta opens the General tab of the new integration.
Under Client Credentials, copy the Client ID.
Under Client secrets, copy the secret. Select the eye icon to show it, or the copy icon beside it.
You also need your Okta domain, for example example.okta.com. It is the domain of your Okta sign-in page, without -admin.
Step 4: Add the connection in SurrealDB
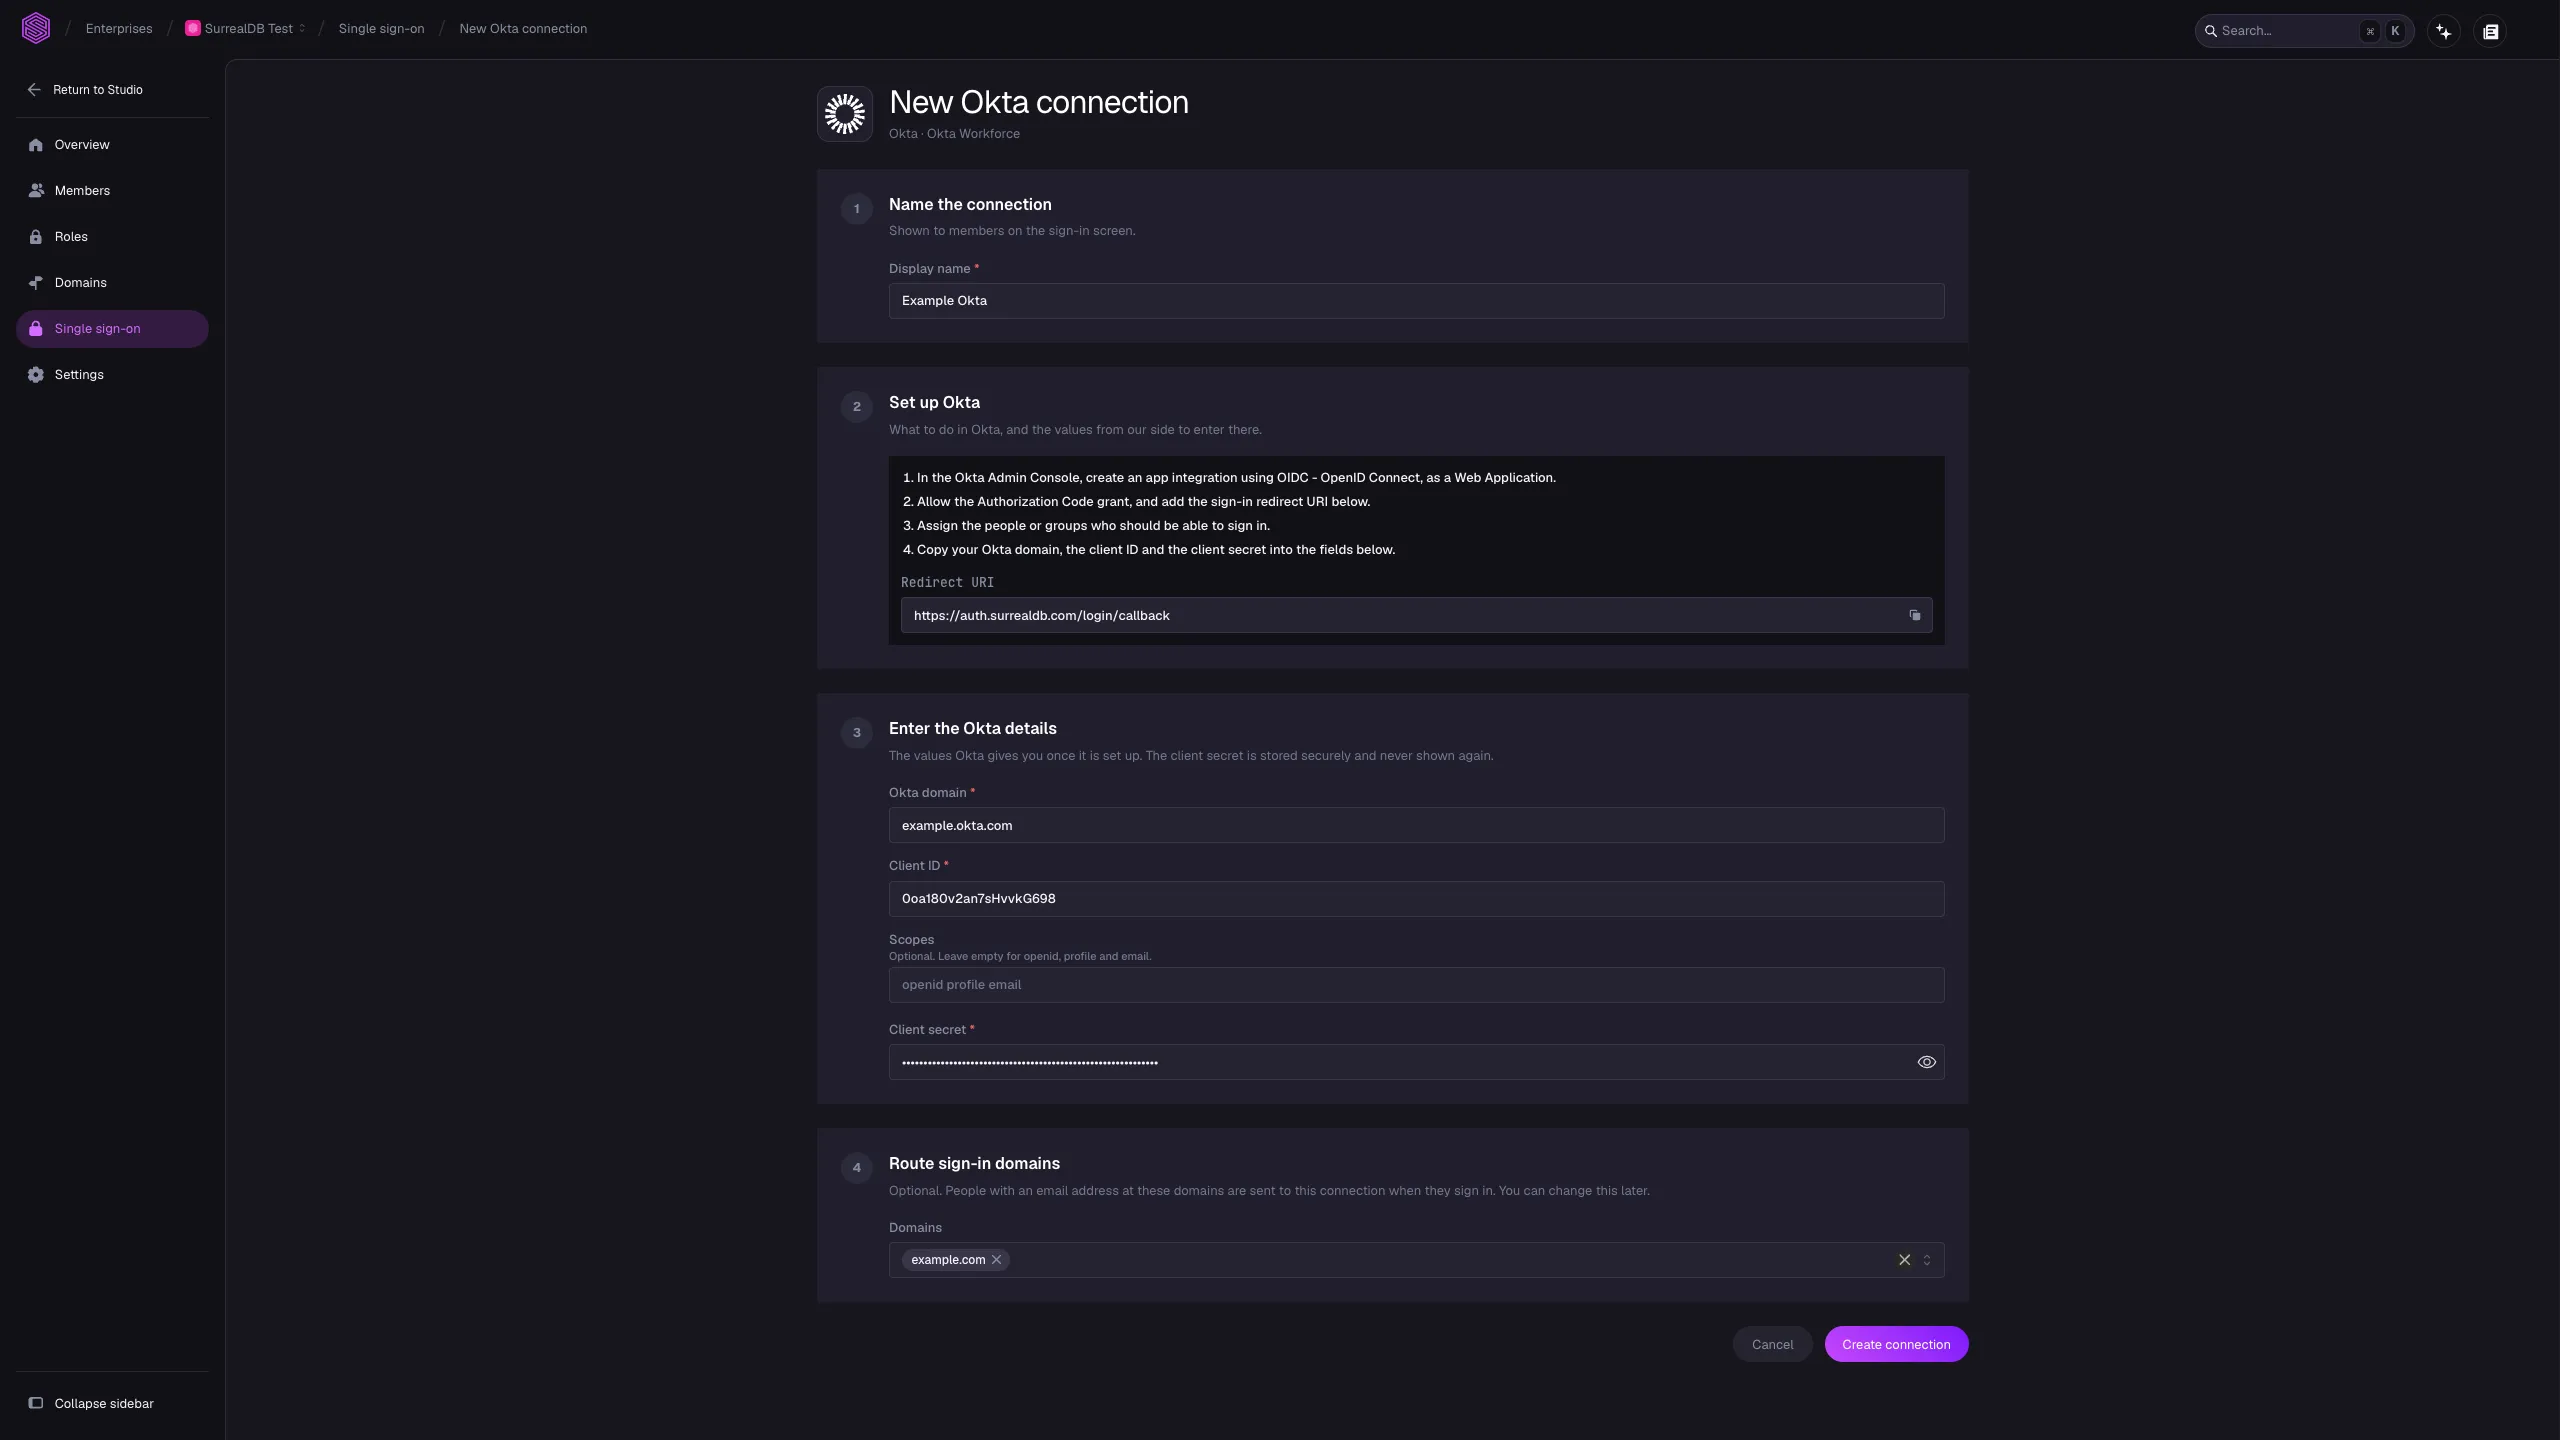
Open Single sign-on in your enterprise and add a new connection.
Select Okta.
Under Name the connection, enter a Display name. Members see this name on the sign-in screen.
Under Enter the Okta details, enter:
Okta domain: your Okta domain, for example
example.okta.com.Client ID: the client ID from step 3.
Scopes: optional. Leave it empty to request
openid profile email.Client secret: the client secret from step 3.
Under Route sign-in domains, select the verified domains to send to this connection. This is optional, and you can change it later.
Select Create connection.
SurrealDB stores the client secret securely and does not show it again.
The connection's Sign-on tab, under Set up Okta, shows the values for the next steps, each with a copy button.
Step 5: Show SurrealDB on the Okta dashboard
The Okta dashboard shows a tile for each app a person is assigned. For the tile to open SurrealDB, Okta needs the address that starts a sign-in.
In Studio, copy the Initiate login URI from the connection's Sign-on tab.
In Okta, open the
SurrealDBapp integration, then the General tab.Edit General Settings.
Set Login initiated by to Either Okta or App.
Turn on Display application icon to users.
Paste the value into Initiate login URI.
Select Save.
When a person selects the tile, Okta sends them to SurrealDB, and SurrealDB signs them in through this connection. They do not have to enter their email address.
Step 6: Sign people out with Universal Logout
Okta Universal Logout signs a person out of every app at once, for example when Okta detects a risk or an admin ends their sessions. SurrealDB supports it through Global Token Revocation (GTR). When Okta calls the revocation URL, SurrealDB ends that person's sessions and revokes their refresh tokens.
Universal Logout needs Okta Identity Threat Protection in your Okta org. Skip this step if you do not use it.
In Studio, copy the Global token revocation URL from the connection's Sign-on tab.
In Okta, open the
SurrealDBapp integration, and edit its logout settings.Select Okta system or admin initiates logout.
Paste the value as the logout endpoint.
Keep the authentication type as Signed JWT.
Set the Subject format to Issuer and Subject Identifier.
Save the settings.
SurrealDB needs no other configuration. It checks each request with the same keys that it uses to check sign-ins from your Okta org.
Step 7: Provision users with SCIM
With SCIM, Okta creates, updates and deactivates people's SurrealDB accounts. Skip this step if you do not want Okta to manage accounts.
Okta does not allow SCIM on an OpenID Connect app integration, so SCIM uses a second app integration. People sign in with the first app, and Okta provisions their accounts with the second. The second app does not sign anyone in, and you hide it from the dashboard.
In Studio, turn on SCIM and create a token for the connection. Keep the SCIM base URL and the token ready.
Create the provisioning app
In the Okta Admin Console, open Applications, then select Create App Integration.
Select SWA - Secure Web Authentication, then Next.
Enter an App name, for example
SurrealDB provisioning.Set App's login page URL to
https://studio.surrealdb.com.Turn on Do not display application icon to users.
Select Finish.
On the General tab, edit App Settings, set Provisioning to SCIM, then select Save.
Connect the provisioning app to SurrealDB
Open the Provisioning tab, then Integration, and select Edit.
Set SCIM connector base URL to the SCIM base URL.
Set Unique identifier field for users to
userName.Under Supported provisioning actions, select Push New Users and Push Profile Updates.
Set Authentication Mode to HTTP Header, and paste the token into Authorization.
Select Test Connector Configuration, then Save.
Open Provisioning, then To App, and select Edit.
Turn on Create Users, Update User Attributes and Deactivate Users, then select Save.
Assign people
Assign the same people or groups to both app integrations. A person assigned only to the provisioning app gets an account but cannot sign in. A person assigned only to the sign-in app signs in, but Okta does not manage their account.
Assign one Okta group to both apps, so the two assignments stay the same.
Okta sends the Okta user ID as the SCIM externalId, which is the same ID that the sign-in app sends. You do not have to change any attribute mapping.
Next steps
If you did not route a domain when you created the connection, route one now.
Choose the applications that people can sign in to with this connection.
Read what SurrealDB does with each SCIM change, and how to rotate a token.